Image

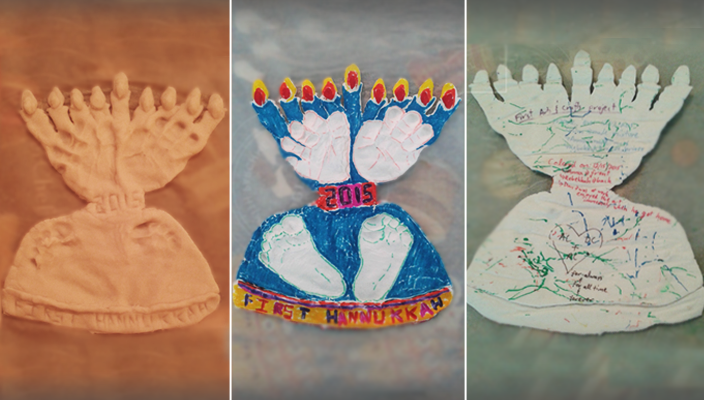
We made this keepsake on the last night of Hanukkah last year. As a fairly new family, making this took all three of us, including our four-month-old, and was such a fun way to introduce our daughter to Jewish culture!
Materials Needed
- Three people: two adults (or helpful older kids) and a baby
- 2 cups baking soda
- 1 cup cornstarch (or tapioca starch)
- 1 1/4 cups cool water
- Markers, glitter, paint, etc. for decorating
Directions
- Add powdered ingredients and water to a pot on the stove at medium heat.
- Stir mixture until it thickens. It's done when it becomes a ball.
- At this point, turn it over into a bowl, cover with a damp paper towel, and let cool until it's not hot to the touch anymore.
- Knead dough until smooth.
- Roll out to about 1/4 inch thick, adding more cornstarch if it's a bit sticky. Leave it on parchment or wax paper
- Split the dough into two halves and shape each into a semi-circle. Join them back to back to make a large hour glass form. Be sure to leave a wide enough spot between the top and bottom sections. Form a Hanukkah leaving enough space to place the baby’s hands and feet. Cut about an inch down between "candle" tops. The baby’s fingers will be the candles later. Use the cut out dough to make candle flames. You can also use leftover dough for bands/labels/whatever you want!
- Here comes the fun part: Placing the baby’s hands and feet takes two people while the ornament is flat on the table. As one person holds the baby, the other will place one hand and then one foot at a time as follows: Push the hand firmly into the dough and then pull it up. Repeat with the other hand, and each foot. We placed the hands under the candles with each finger approximately under each candle of the menorah, and the thumbs meeting at the center candle (the ), and the feet at the base, holding the whole thing up.
- Write the year and "First Hanukkah" into the dough using a butter knife or toothpick. Be sure to write after the prints are made to avoid squishing the letters.
- Let it cool until it hardens. This may take a few days, flipping it over very carefully once or twice a day. You'll know when it's done.
- Decorate however you want! We used Sharpie and markers; you can also use paint, glitter, etc.

